Sort - The First 5S
If you or your team are looking to implement or enhance your current work area using the 5S methodology, and you want to know how to begin your 5S journey, let’s go through the required steps to complete the “Sort” phase. I’ll also introduce you to some helpful tools that will make it easier for you to complete your first 5S area.

Step 1 - The Team
To start improving the chosen work area using 5S principles, you’ll need to gather a cross-functional team that is willing to make changes and has a good understanding of each step of the process. Your team should consist of a supervisor, a materials/purchasing staff member, a manufacturing/industrial engineer, maintenance staff, and staff working in the area. It’s important to let the team members know that you will need their help.
This is the core team that will help you with the improvement, but I suggest involving more people so they can assist and learn about 5S. If any of your team members are unfamiliar with 5S, you can have them watch the training video linked below to gain a better understanding of 5S.
Step 2 - Talk To The Staff Working In The Process
When trying to get staff in the process to help you with the 5S project, it’s crucial to approach them positively and avoid telling them what they can or cannot keep. If you came into your office and someone started telling you what to throw away, you would probably be furious. Therefore, when speaking to the team, let them know about the benefits of the 5S process and how it can help to improve the entire process. Explain the different steps you will be taking to organize the process and help the business be more efficient.
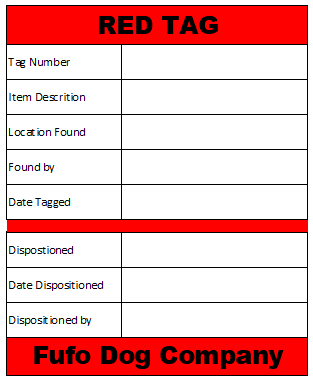
area that needs to be removed, needs a red tag assigned to it with the information listed on the sheet.
Step 3 - Red Tag
The Red Tag process is used to remove all unwanted parts and tools out of the work area. The basic rule of the red tag process is to remove all items from the area that are not needed and have not been used in a long time. Some examples of items that could be removed during the red tag process are;
- Obsolete parts – these can be scrapped or used in different areas in the company
- Obsolete tools – place these tools in a tool storage in case others break
- Extra tools – you do not need four 9/16” wrenches in one area for one person, put the extras in a tool crib or offline storage
- Obsolete fixtures
- Extra storage bins
- Over stocked parts – if you have 8 months of inventory in your work area, that is too much. Move extra parts to an internal warehouse or back to the supplier.
Every item that you find in the work area that needs to be removed, needs a red tag assigned to it with the information listed on the sheet.

The red tag is a visual flag that tells people that these items are not wanted in the area and can be moved to a different area with a use for them or scrapped. All red tag items need to be moved out of the area (or disposed of) within one day of the Red Tag audit.
Please ensure that these items are not placed in another corner of the factory, as there is a possibility that they will be forgotten about. During the red tag audit, it is important not to hoard unnecessary items. If there are team members who are holding onto such items, the team needs to explain why the red tag audit is being conducted.